tutorial

Adios February

Sometimes life runs according to plan, and sometimes is doesn't at all. My February was full of surprises. FEB RECAP:

Travel hair I drove down to Florida with Sammy for Spring Training. Hard to believe it's Spring Training when Chicago is getting lambasted with snow right now.

Union Hotel

We stopped in Nashville along the way for a night of live music and authentic BBQ. We stayed at the Union Hotel which I HIGHLY recommend.

FLA

Florida was magic. I ate at my same favorite restaurant like four times in a matter of days.

vegas

I was back in Chicago for less than a week, but worked two full work weeks in that time. Then, it was off to Vegas for the Project & Magic apparel shows for Bonnie & Clyde. We wrote some fresh new lines, attended seminars, and even had a second to dip our toes in the pool. All good "I miss Sammy" distractions.

kina

While I was out west Kina took some photos of me in the desert! We had too much fun hiking in heels and singing Sara Bareilles as the sun set. Love that girl.

IMG_0648aj2

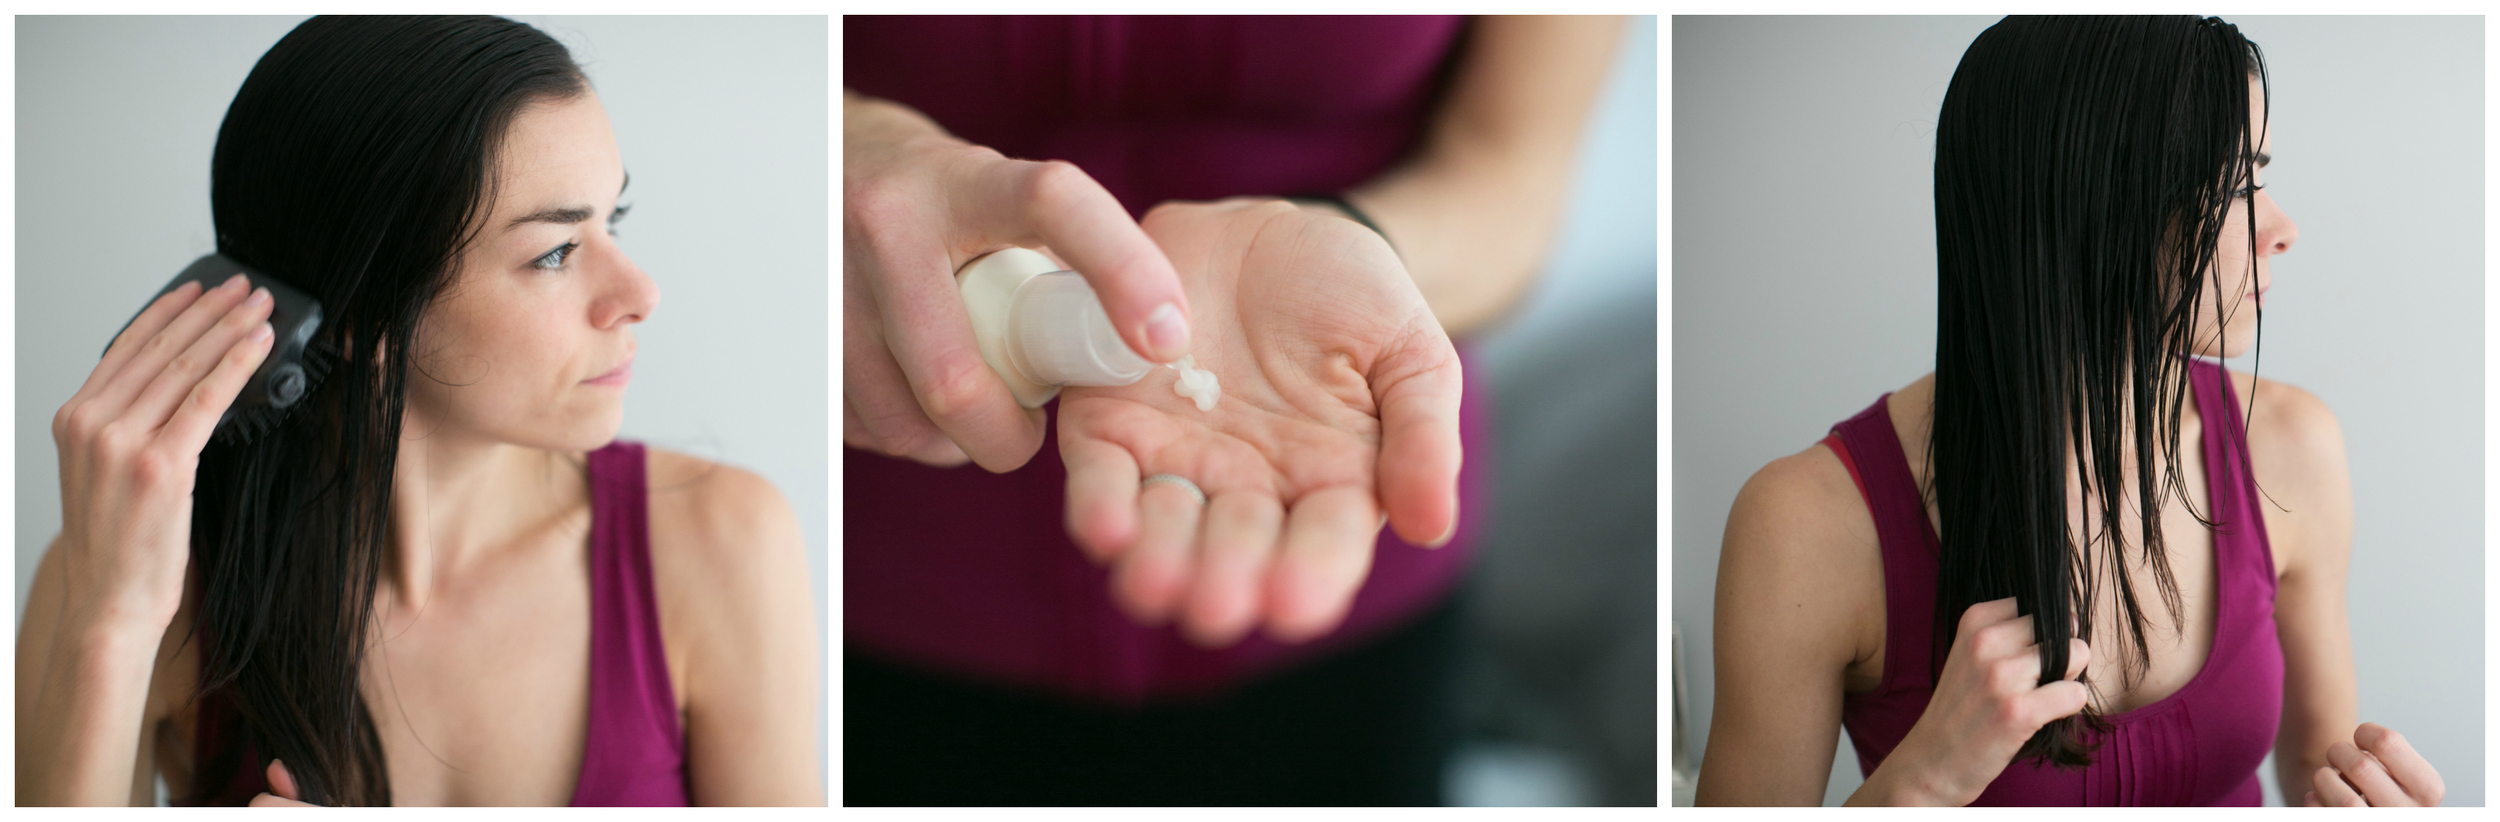
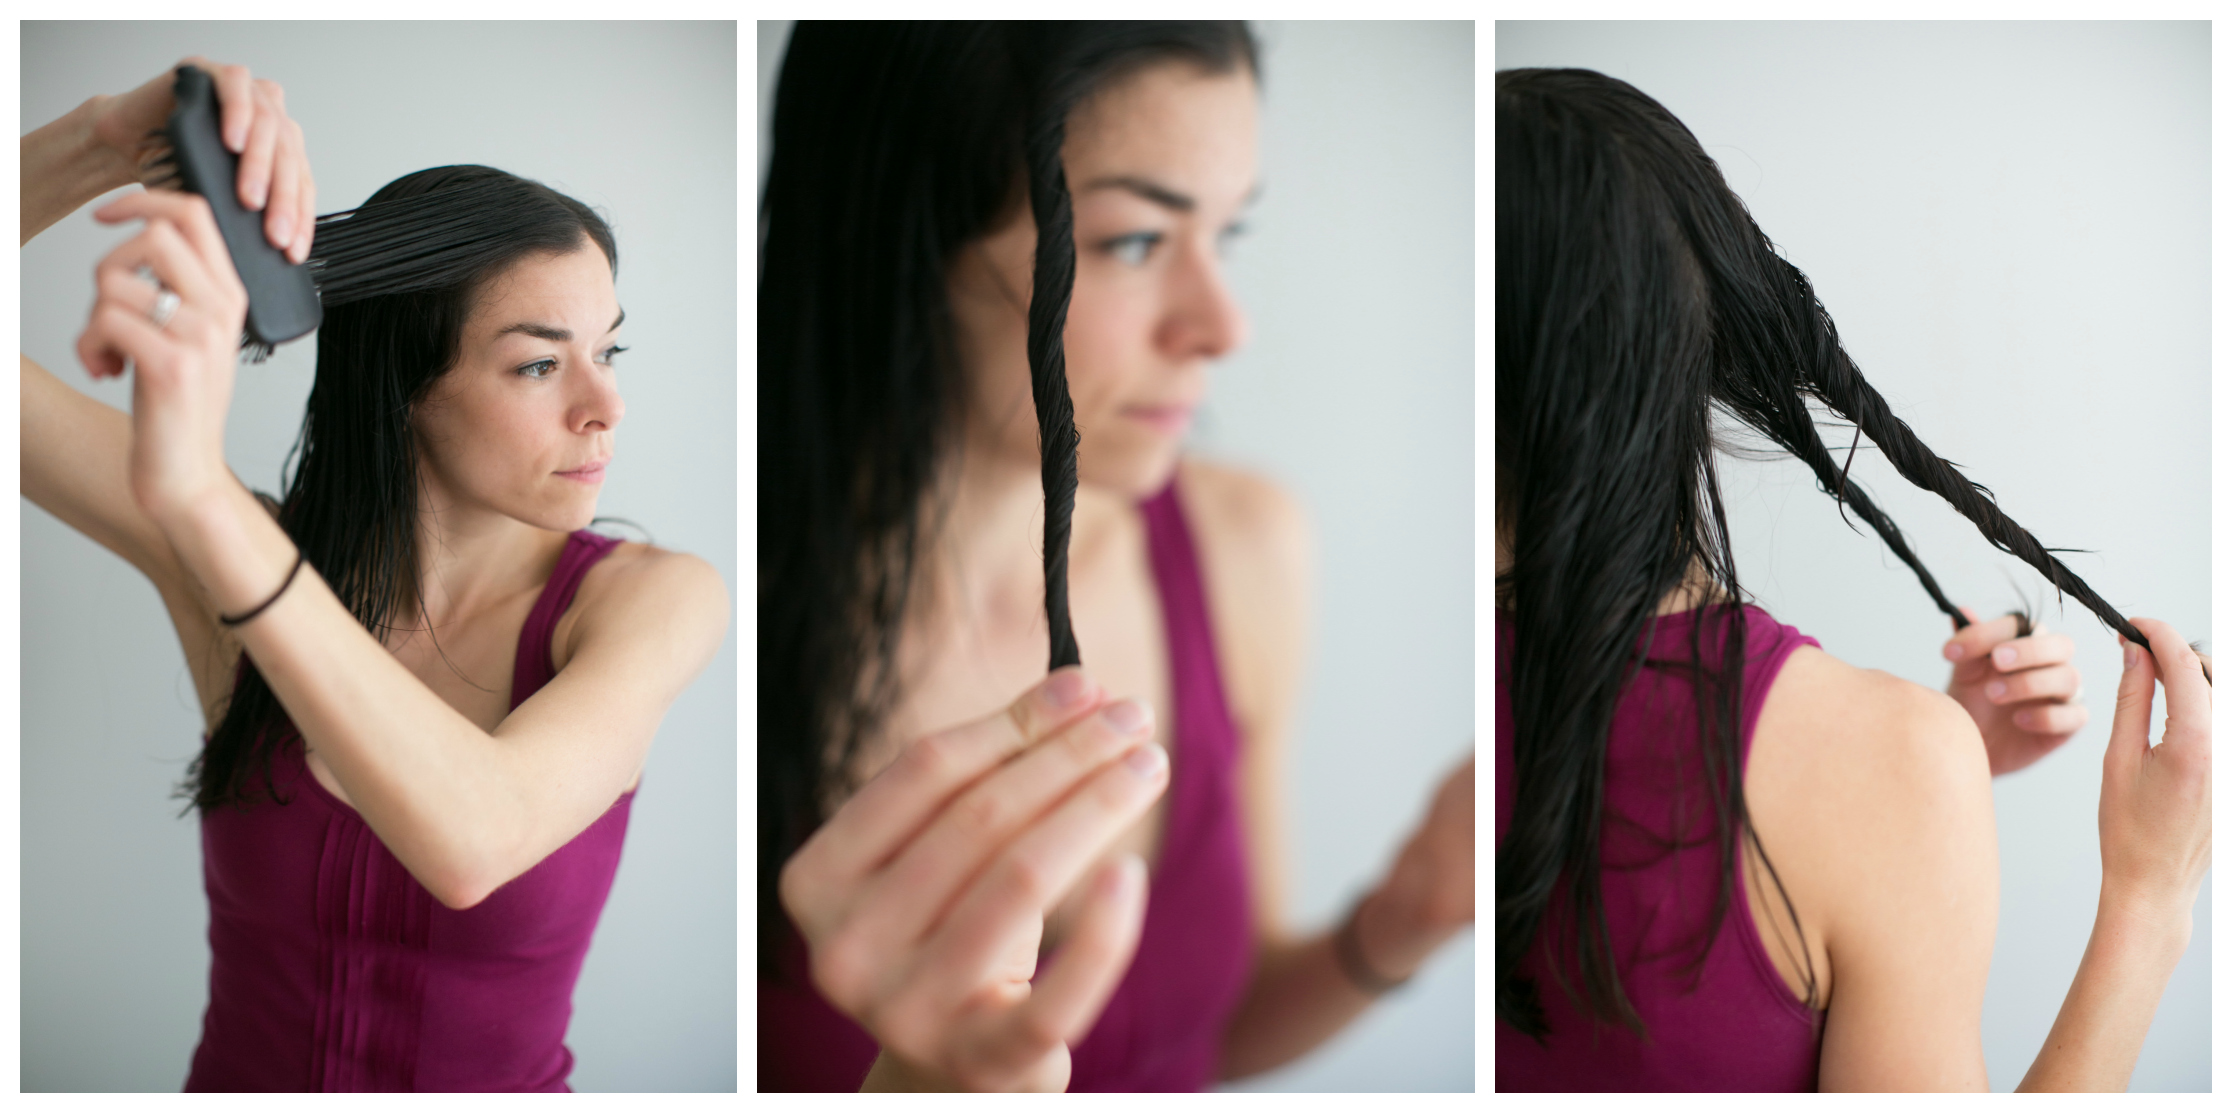
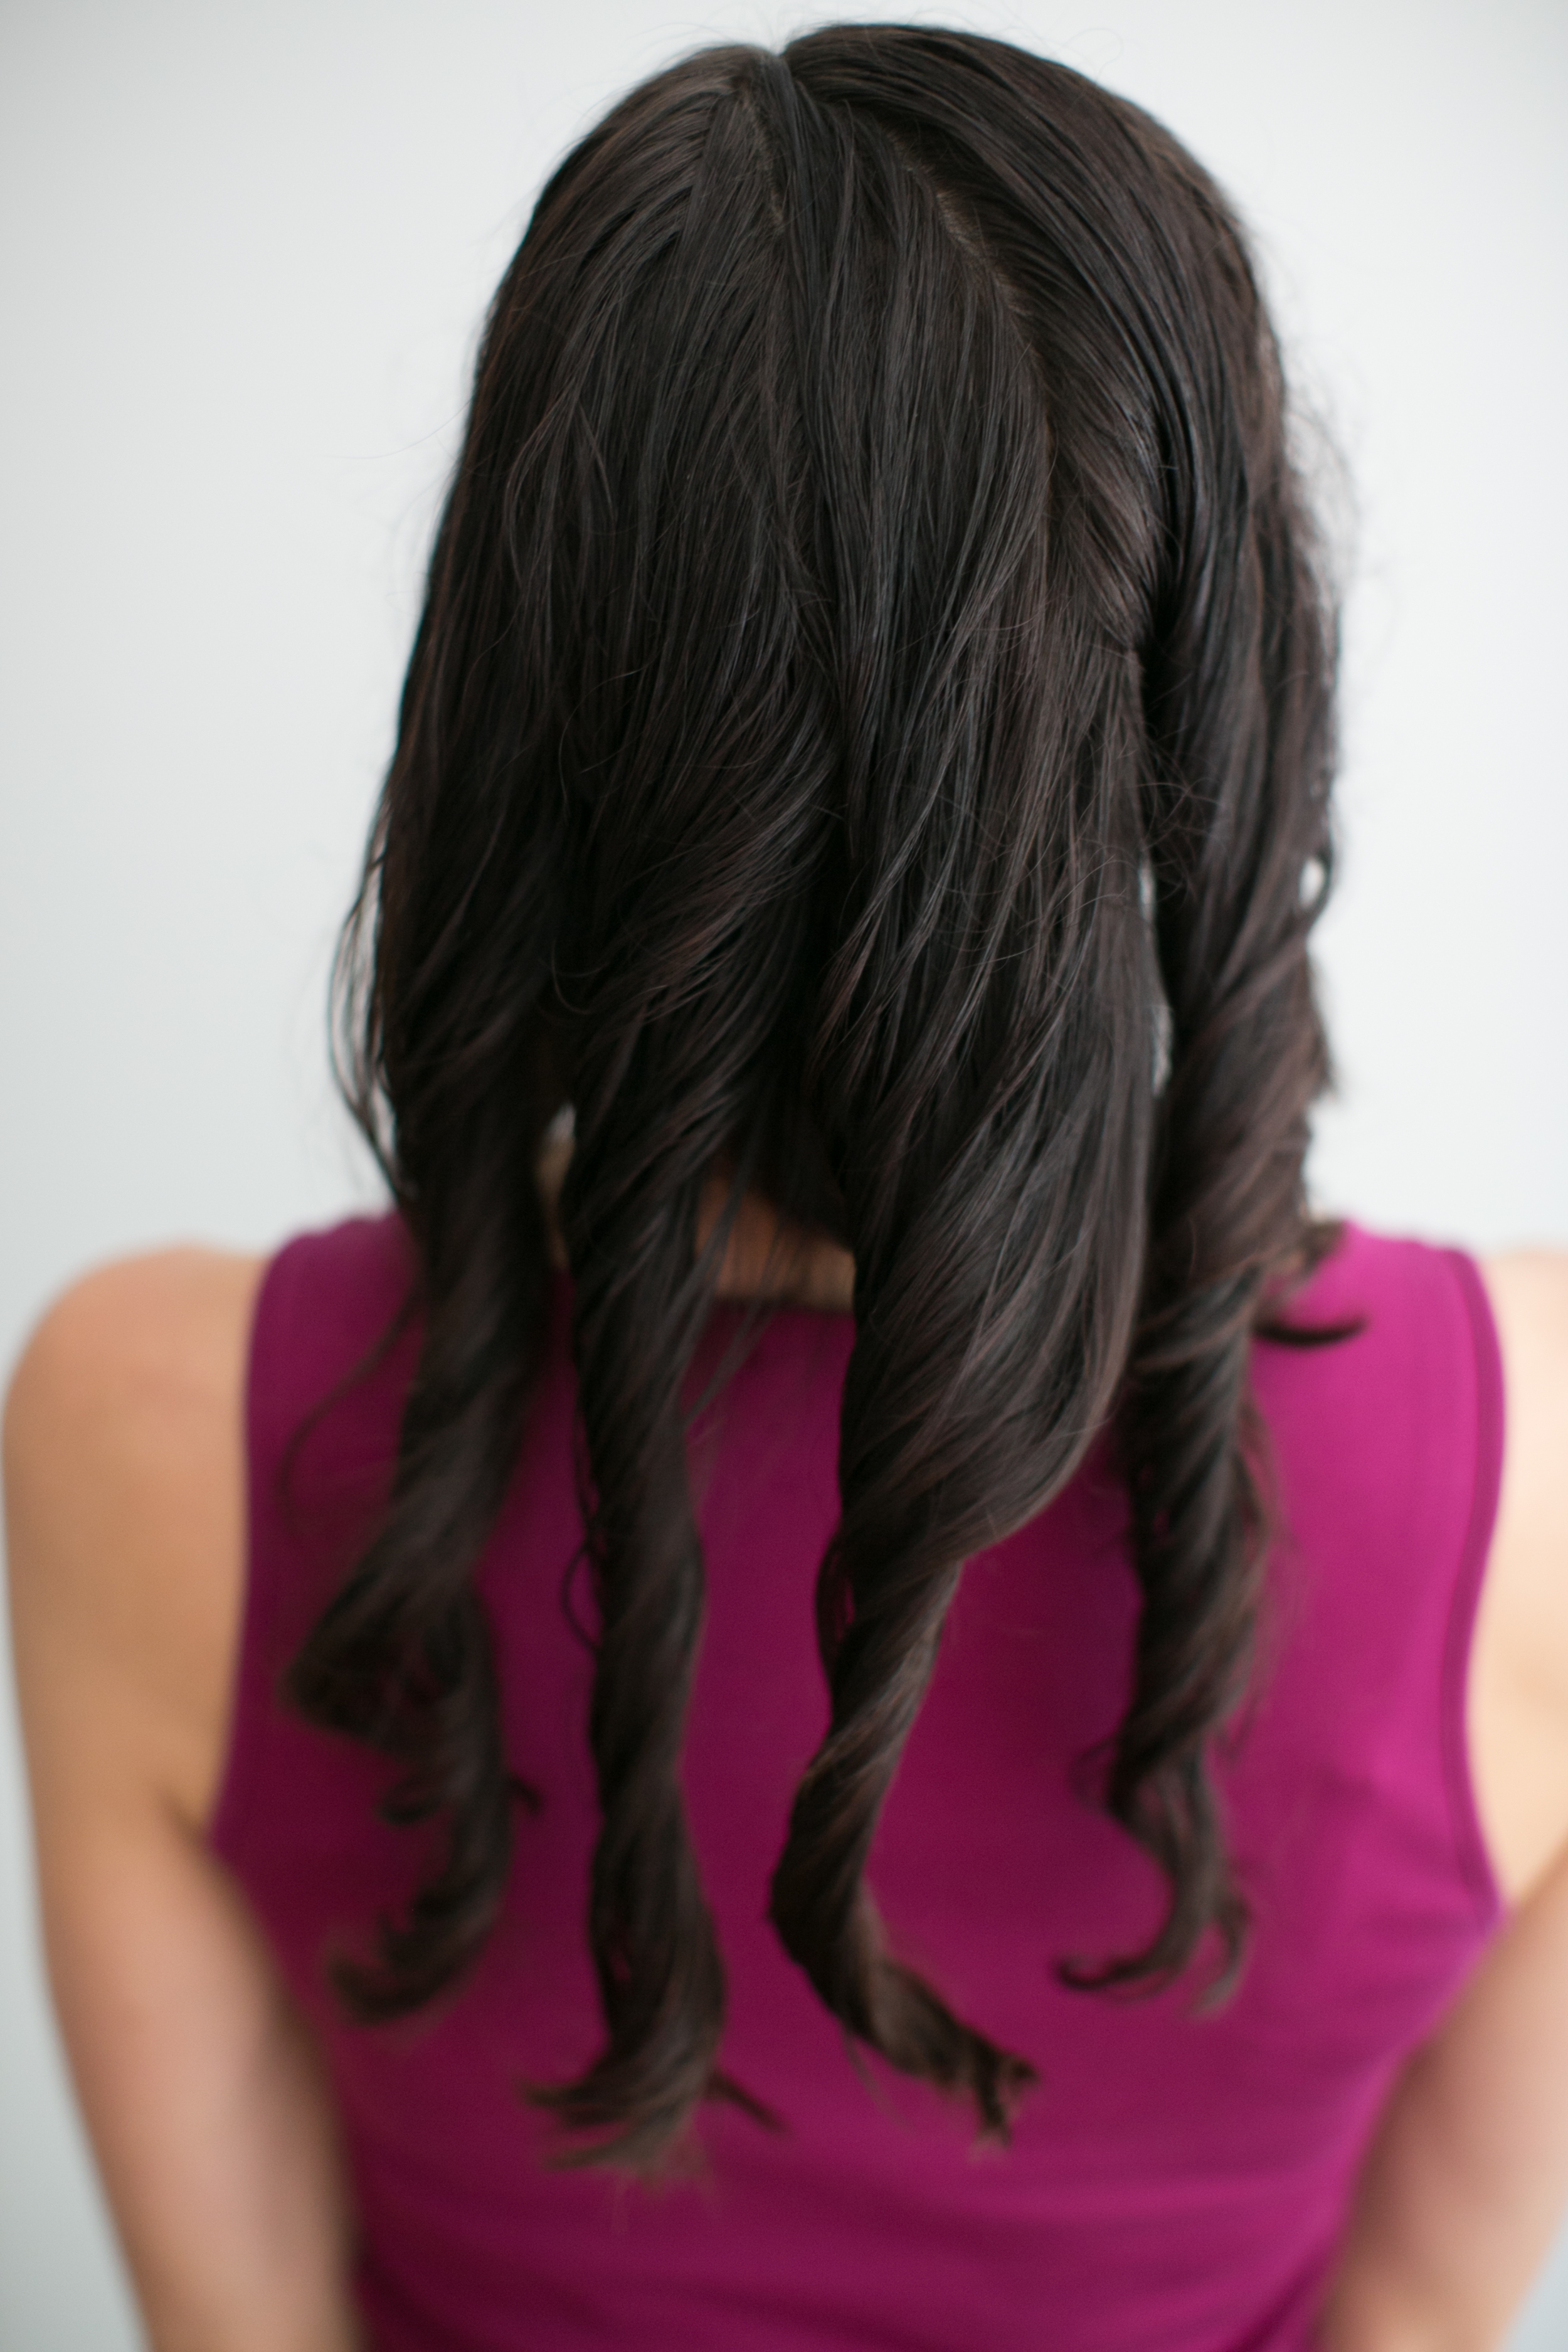
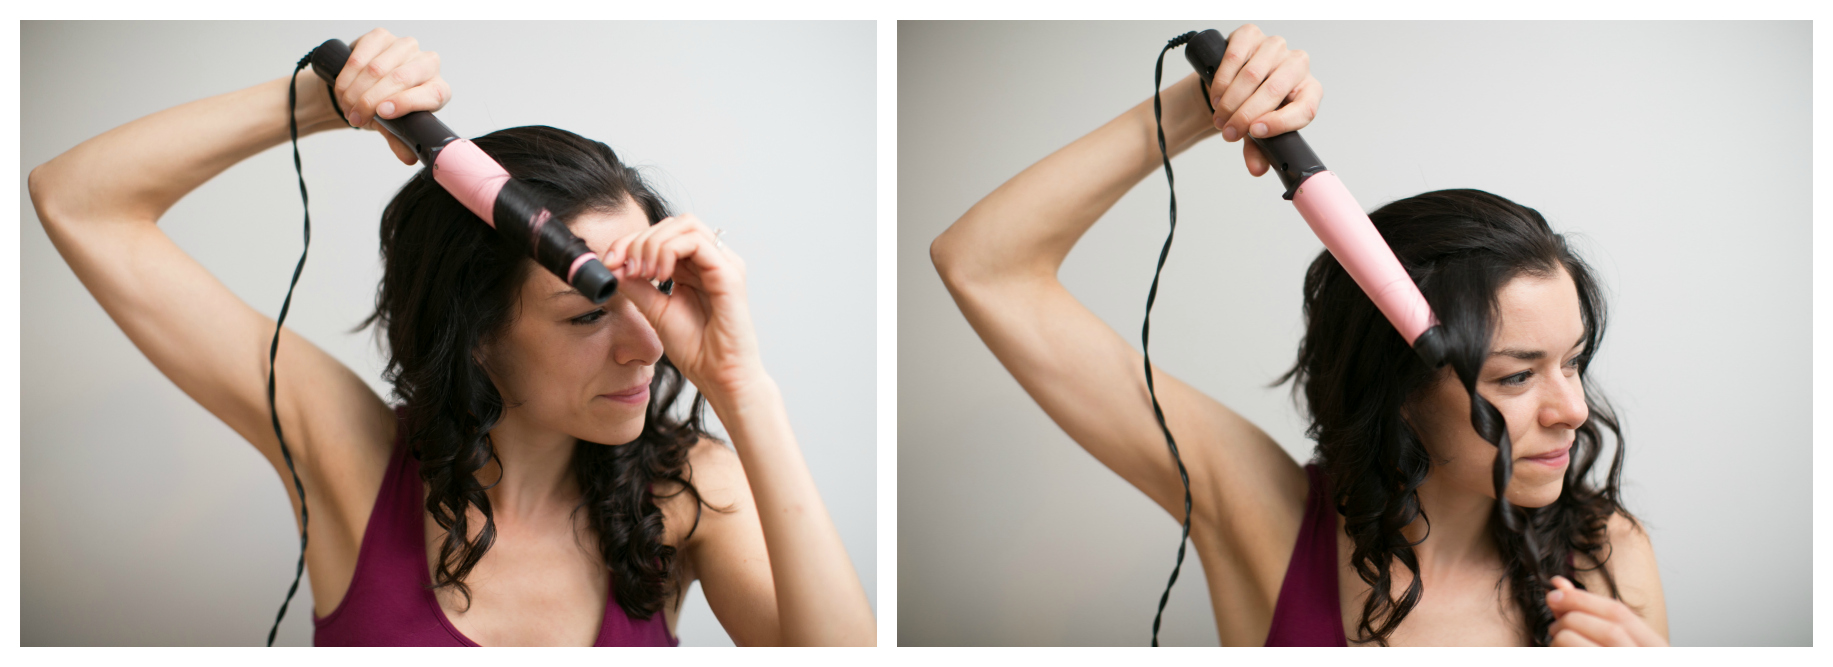
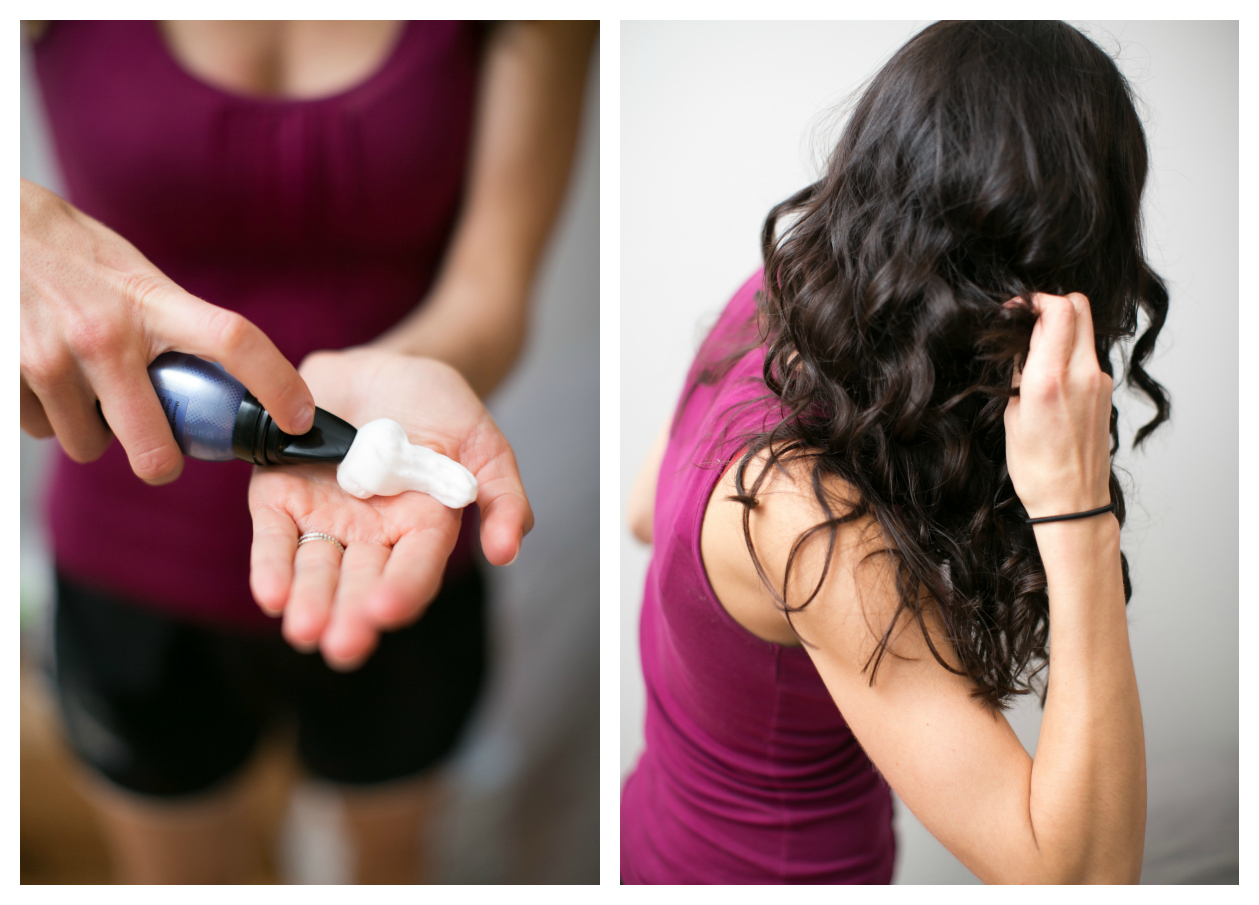
As soon as I got back I spent two days revving up the courage to apply for the Allure Magazine Beauty Blogger competition. Part of the submission asks for a video, so I finally worked up the courage to post a video tutorial after two years of terrifying anticipation.

Screen Shot 2014-03-03 at 9.51.13 AM

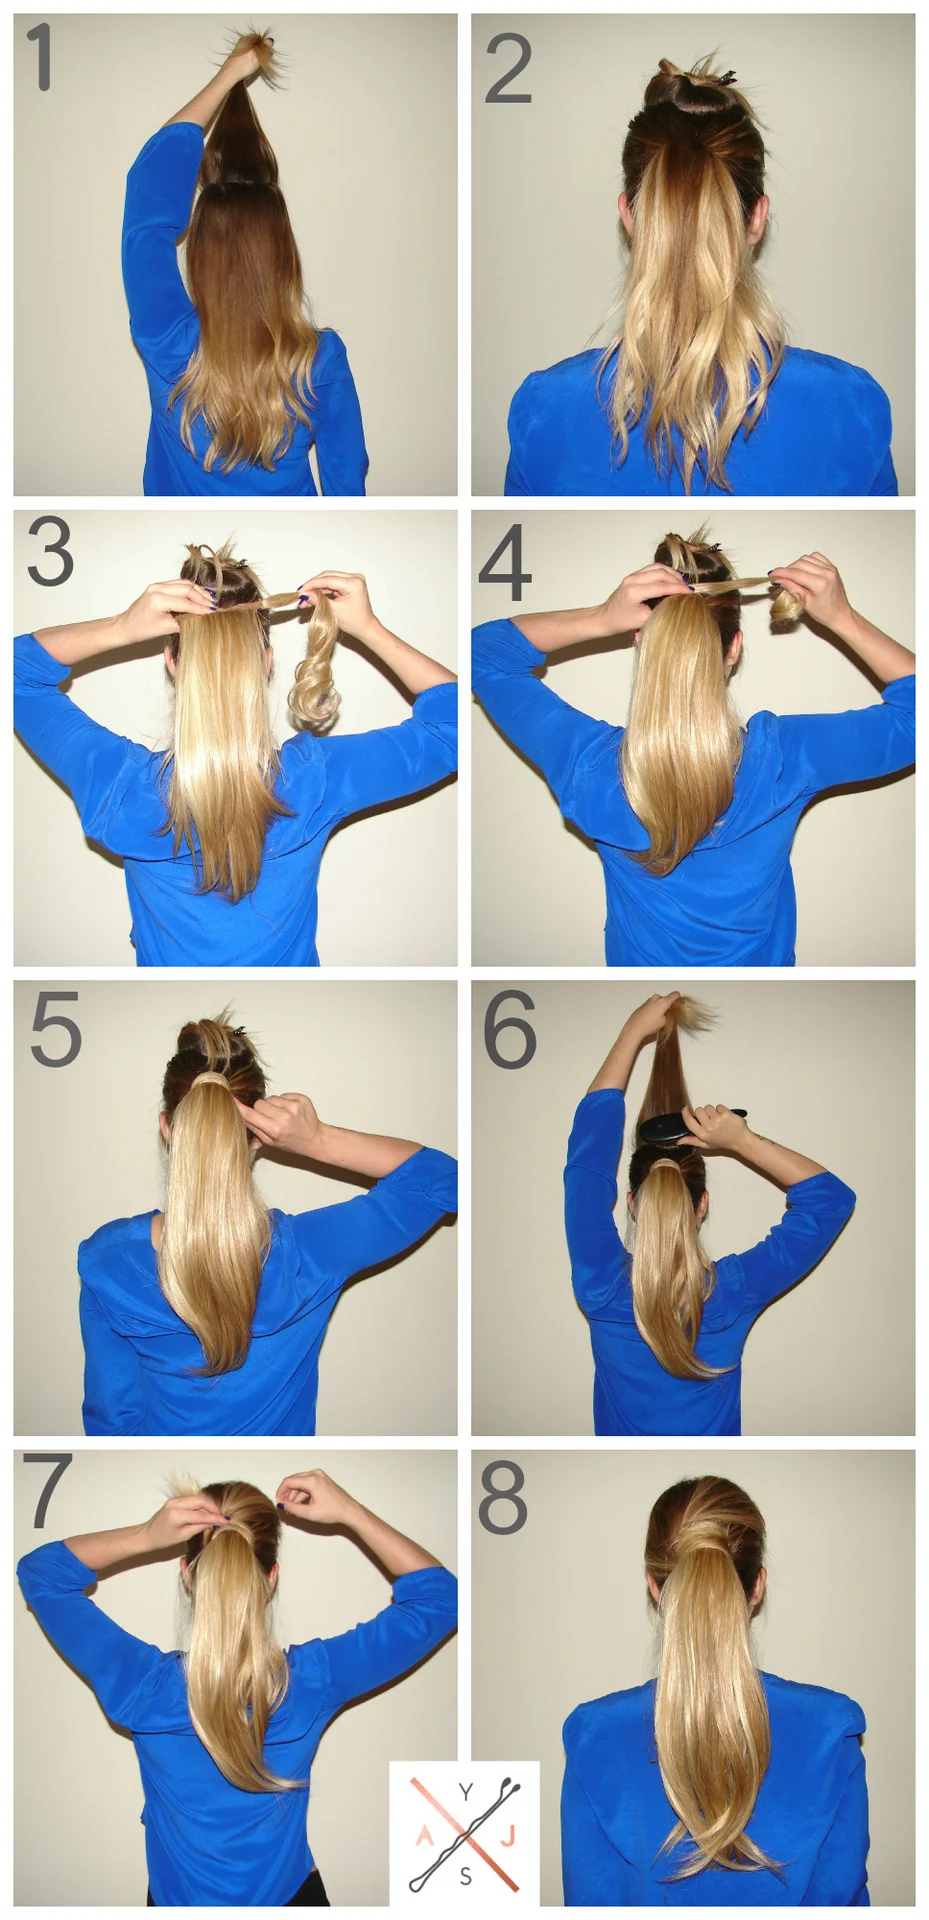
The NEXT day I got a call from Goody. They had just seen my video and were interested in shooting tutorials with me in NYC for the weekend. So I refilled my suitcase for the third time in three weeks and headed to the airport with my gorgeous and talented friend Lindsey for the weekend. Friday was a long day of consulting and test shooting, and then yesterday during the awards we recreated looks we saw the celebs rocking and released them right away. You can view them all HERE.

happybones

As soon as I was done, I learned my flight for this morning was actually cancelled. I've spent a combined four hours on hold and still won't be getting into Chicago before 9pm. So, I'll make the best of it with amazing coffee and even more amazing spoons. (Photo by #EATPRAYPHOTO)

THINGS I LEARNED THIS MONTH:

Ask and you shall receive.

Put yourself out there, you have nothing to lose. Really.

Friendship is weird. In a good way.

NYC has the best latte I've ever had. If you visit check out Happy Bones.

The camera adds ten pounds but I clearly have more than that to lose. Back on the paleo grind effective immediately, but more importantly, excited to get serious about working out. I'm craving that healthy routine and feeling really good and light. Who wants to go to yoga and Flywheel with me this week?

I appreciate Chicago.

My family is pretty awesome. They acted like I was actually a celebrity instead of just mimicking celeb hair.

I'm continuously blown away by Sammy. I have learned so much about life and hard work from that man. So proud of him.

How was your February? Cheers to March!

XO AJ

Hair Tutorial // Half Up Headband

Bobby pins aren't for everyone, so grab the nearest elastic headband and you can have a gorgeous half up style in seconds! I recently posted this pic on instagram and you asked for a tutorial. Get ready, it's SO easy.

Your Stylist AJ Hair Tutorial

1. Begin by placing an elastic headband over your head. Play around to find your comfy spot! The gold headband I used is from Urban Outfitters, but I've done this look with an inside out Under Armour workout headband and it looked dressy too!

2. Take a section of hair from the right side of your head just above your ear and wrap towards the left.

3. Tuck the section into the headband from top to bottom. No pins required!

4-5. Repeat on the left.

6. Rock your look and soak up the zillion compliments you'll get all day!

Your Stylist AJ Hair Tutorial

Feel free to leave questions or comments below!

XO AJ

Top is from Anthropologie

Thank you to the amazzzzing Emilia Jane for the photography!

Wavy Hair Tutorial

Welcome to YSAJ 2014! Get ready for a heck of a lot more tutorials! Girls with straight hair often want curly hair, and girls with curly hair often want straight hair, but where does that leave girls with wavy hair? Wavy hair is tough, some days it air dries like a Victoria's Secret model, and some days it just looks homeless.

Enter: Your Stylist AJ! When Chicago wedding and lifestyle photographer, Christy Tyler, posted on Instagram about discovering she had some natural wave/curl but didn't know how to style it, I invited her to come into Thomas West Salon. I taught Christy how to easily embrace her natural texture and rock it!

You will need:

  • a Wet Brush or comb
  • curl enhancing products // we used Aveda Be Curly (even Chloe pup digs it!) and Bumble and Bumble Thickening Full Form Mousse (both available at Thomas West Salon)
  • curling iron or wand (optional)

products used


Lets get started! (In my best aerobics instructor voice!)

1. Shampoo, Condition from ponytail down, and towel dry hair. Comb through, and towel dry again. If too much water is still in the hair, it will actually create a barrier for the product. Add your curl enhancing product to your palms, and rake fingers and hands through your hair, beginning at the ends, and using what's "left over" on your roots. curls step 1 2. Comb large sections of hair up at a 90 degree angle, and begin twisting away from the face. Twisting with the 90 degree angle ensures you get plenty of volume. Work your way back section by section until all hair is twisted. curls pic 2 twistIt should look a little like this!

NI4A3355

3. I suggest doing steps 1 and 2 at night, and sleeping with your damp twisties either down or in a messy bun, from there you can wake up and shake it out! How cute is Christy!? If you prefer to shower in the morning, I suggest air drying.

shake it out pic 4 4. Most girls with natural texture have the most wave in the ends, I recommend touching up just a few pieces on top for added polish and volume. You can do this using a regular curling iron, curling wand, or by curling with your flat iron. (BONUS TIP: You can use your curling iron like a wand by not opening the clamp!) wand pic six5. Add a finishing product and work through to add volume and extra dimension. Hair spray is great here, but I like breaking the rules and using mousse sometimes! mouse pic 6It's that easy! If you sleep with your wet twisties, all you have to do is wake up to shake and add a lil product! Plus skipping the step of blow drying gives your hair a break from high heat!

Have fun! XO AJ

Photos by Christy Tyler Photography 


Hairdo Wrap Pony

“Clip in ponytail” doesn’t exactly have a classy ring to it… but for a reason unknown to me, I’ve always wanted to try it. My hair is already (pretty) long, but this works on almost any length. If you can get your hair into a ponytail, even if it’s two inches long, you can absolutely rock this look.

I purchased the HAIRDO Wrap Around Pony, (in Golden Wheat), and the color blended perfectly. The steps are actually extremely simple, but I’ve amped up the look by adding a top section to wrap around the pony to not only better blend color, but look even more sophisticated.

1. Section off a top portion of your hair, and clip it out of the way

2. Gather the remaining hair into a normal ponytail

3. Align and pin, (most come with built in pins), the extension piece to the top of the ponytail

4. Wrap the seam around your natural ponytail, securing the velcro for a snug fit

5. Now wrap the “extra” piece around the base of the new ponytail, and pin 

6. Unclip your first top section and lightly backcomb for volume if desired

7. Add the top section to the ponytail by wrapping it around the base, and pinning

If you have any questions please feel free to leave a comment below and I’ll make sure to help! Have fun : )

XO AJ

Makeup.com


Your Stylist AJ is featured on MAKEUP.COM today! You might remember the above photo from THIS TUTORIAL. When I created this tutorial, it was a last minute, “shoot I need to post a hair tutorial… what have I done lately” situation, and it has somehow BLOWN UP on Pinterest with 892 pins! (what!)

When MAKEUP.COM contacted me about the feature I was smitten. Thank you!

To view their post, CLICK HERE.

XO AJ

Nail Tutorial // Scallops

I fell in love with all things scalloped in the Spring, and yes it’s now November, but I’m far from over it. 

After my last sassy mani, I decided to do something a bit sweeter. What do you think?

The colors above are both Essie. The base color is “Love and Acceptance” and the tip color is “Fiji”. 

  1. Paint your nails as usual, then with a toothpick or nail dotting tool, create small dots of paint
  2. Connect the dots toward the tip of the nail
  3. Spread the bubble of polish in a circular motion until your desired scallops are set
  4. Top coat (not pictured)

Stay sweet! AJ


Makeup Makeover

I love a good crush! 

Just getting home from work, I’ve been stuck between going for a run, or running to Molly’s Cupcakes. I settled on blogging and today want to talk about finding a solution for my most frustrating moment… broken makeup.

We’ve all been there, whether you pull your makeup bag out of a suitcase after two flights and a cab, or you drop your compact in the sink, or magically it’s now a loose dusty mess imbedded in your bathroom rug.

Tossing our shattered $30 hues is extremely frustrating, so instead I’ve started collecting them all in a jar. Everytime one breaks, I crush it into a fine dust, and add it to the jar. If they don’t all match, it’s totally okay, think of it as creating your own custom blend!

XO AJ

Country Nails

I’m going to my first country concert everrr. Yes, ever.

I know what you’re thinking, and yes, it IS a miracle I’ve never seen Taylor Swift live. It’s equally surprising we’re not bffs. I will do her hair one day. You watch.

BUT, I’m not going to Taylor Swift, I’m going to Sugarland in a couple of weeks. Pretty excited for the whole sundress and cowgirl boots getup! I decided to find something to separate myself from the crowd… COUNTRY NAILS!

  • Choose a base color and paint
  • Choose one or more accent colors and paint one coat onto tape
  • Allow to dry and cut into thin strips
  • Apply in desired pattern and cut to your nail shape and size
  • Apply a top coat

XO AJ

RED Alert!

  YSAJ

Too many ladies aren’t wearing red lipstick because it’s overwhelming to “deal” with. It can be a tedious application, and can get sloppy is not taken seriously.
So I give you… MY TIPS:
I’m a huge fan of fully covering my lips with my foundation FIRST, then applying powder onto them and finally applying the red lipstick. This fills the creases on your lips where excess lipstick tries to gather, and bleed from.
LipLINER. This is no joke. Even if your liner is the same color, it creates an outline and helps prevent bleeding! Keep that puppy SHARP too! A dull liner doesn’t create a crisp clean line.
Carefully lick the rim of your wine glass before sipping! Be sneaky or you’ll just look odd. The moisture creates a barrier and prevents lip color transfer!
Reapply, and blot. A trick from my Gram, and seriously necessary.
Pucker up! AJ
Photo by Kina Wicks

Fishtail Braid Tutorial

When I was little, I taught myself how to french braid, on my own head, via trial and error. Turns out my mom was also self taught when SHE was little! Clearly it’s in the blood.

So you can imagine my surprise when one of my lovlies came to me and asked for a braid tutorial. Though I think she’s a minority in this situation, (sorry Amber), I’ll be working with her one on one with her braiding! BUT, this motivated me to teach an even SIMPLER braid that’s hot right now, and not many people know how to do it.

The fishtail braid is great for those with little coordination. Instead of using three strands like the classic braid, you only use two!

K! Here we go!

1. Part your hair into two even sections

2. Take a small strand of hair from the right section and bring it over to the left side (Make sure to take small sections, or it will look more like a regular braid)

3. Repeat on the other side, taking a small piece of hair from the left and ADDING it to the section on the right

4-5. Repeat steps 2 & 3 until the fishtail is complete

6. (Suggested but not pictured:) Pull the braid apart to “fatten” it up for a more lived in bohemian look, OR wear this on the side!

Just keep swimming ;) AJ